You're working on a project on your PC and actually making progress for once. You're about to finish, and just before you save the data.... the system crashes! All you data is lost, and now your only motivation is to take a stick of dynamite to the PC.
Unfortunately PC's break down and crashes happen. Before taking the PC to a repair shop and spending 80/hr having someone you don't know fix it, why not diagnose the problem your self and find out what's wrong, and see if it's something that you can fix. This is a two part post on how to troubleshoot and diagnose problems with the PC. These first few posts will cover hardware issues and how to diagnose them.
Diagnosis:
Random Access Memory or RAM, is memory that is used by programs to run. The more memory a PC has, the more memory the programs can use for their operations. Whenever RAM fails, the information that is written by the program is different that the information that is written onto the memory module. For a simple example, if the program writes "Hello", a bad sector of RAM could write it as "elHlo". This causes the program to pull corrupt data from the memory, and causes crashes of the program.
Typical signs of memory are therefore program and/or system crashes. In windows, this is typically followed by the infamous "Blue Screen of Death". This will be especially prevalent during high memory usage programs such as:
- Video Games
- Installations
- Photo/Video Editing
Another sign of memory failure can be a failure to boot. This can be followed by a continuous beep from the system, which is an indication that the BIOS has detected a massive memory failure. (
reference site)
Whenever you suspect there is a memory failure, the first thing you should do is re-seat the memory modules. Remove the case from the PC, and locate the memory modules. Remove them from the motherboard. At this time, I typically clean the modules with a Q-Tip dipped in rubbing alcohol. The most important part of the memory modules are the golden tips on the edge. This is where the motherboard access's the memory, and if it's not clean then there can be problems with reading/writing to the memory.
Next, make sure that the memory seats (the sockets where the memory is installed onto the motherboard) are clean and free of dust as well. Use canned air to clean out the sockets of any dust. Re-seat the memory sockets and boot up the PC. If originally you were having issues booting up the PC, try seating only one module at a time. This is a quick way to determine if one of the memory modules is the bad modules or if one of the motherboard memory seats are bad as well.
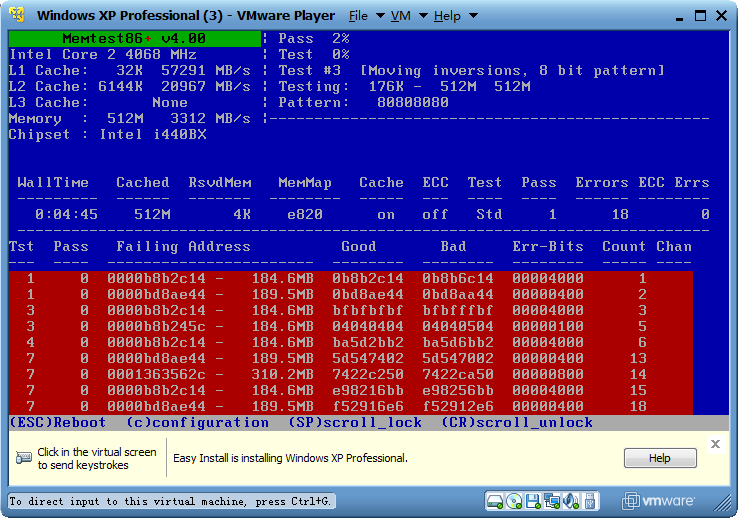
After you have determined that the memory is clean and free of dust, the next thing to do is use Memtest86+. Memtest86+ will write data to the memory and the instantly read back that data and compare the two data strings. If they match, then there aren't any problems with that section of memory. If they don't then there's a problem with writing to the memory.
 |
| Screen Shot of Memtest86+ |
Memtest86+ is a bootable program which means that you have to boot to the program. I suggest using a USB flash drive to accomplish this. I have posted a How To here on how to set this up.
Another way to have access to Memtest86+ is to use a ubuntu live cd or use Hiren's Boot CD. Most other bootable CD recovery packages have Memtest installed on them.
Once you've booted up into Memtest86+ just let it run and do it's work. There's really no involvement other than waiting for Memtest to find errors. If there are errors that Memtest detects, it will display them on the bottom half of the screen highlighted in red. It's good practice to run Memtest for at least 7 to 8 passes. Since each pass can take anywhere from 30 minutes to an hour, it's a good idea to run the testing overnight. If errors appears right away, this is a big sign that the memory is bad or dirty, but can also be a sign of the actual socket failure, meaning motherboard failure.

No comments:
Post a Comment